Crochet Angel Pattern
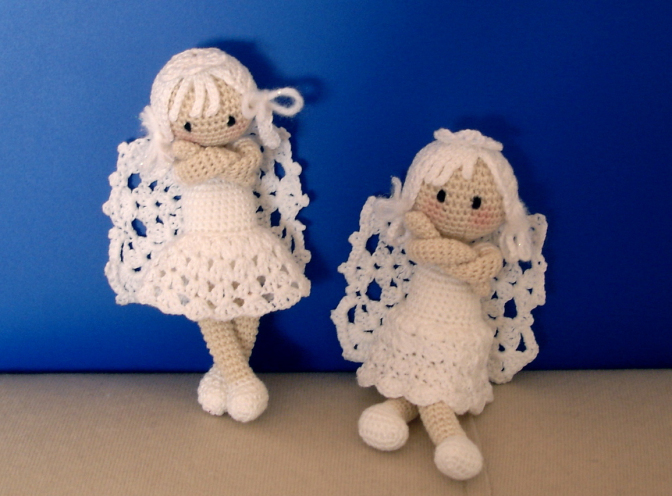
Crochet Angel Pattern step by step
Head
Flash color of your choice
Sc6 in magic ring
R1 inc6 (12 sts)
R2 *inc1, sc1* x6 (18 sts)
R3 *inc1, sc2* x6 (24 sts)
R4 *inc1, sc3* x6 (30 sts)
R5 *inc1, sc4* x6 (36 sts)
R6 *inc1, sc5* x6 (42 sts)
R7-R11 sc42
R12 *dec1, sc5* x6 (36 sts)
R13 *dec1, sc4* x6 (30 sts)
R14 *dec1, sc3* x6 (24 sts)
Begin stuffing
R15 *dec1, sc2* x6 (18 sts)
Add more stuffing
R16 *dec1, sc1* x6 (12 sts)
Tie off.
Body and legs are worked together
Legs (make 2)
Start with white
Ch7
R1 sc5, 3sc in last st, work around chain, sc4, 2sc in last st (14 sts)
R2 inc1, sc4, inc3, sc4, inc2 (20 sts)
R3-R4 sc20
R5 sc5, dec5, sc5 (15 sts)
R6 dec1, sc3, dec2, sc3, dec1, sc1 (11 sts)
Stuff the bottom legs.
Change color to skin tone
R7-R26 sc11
Stuff legs very, very light.
Making body
With white thread/yarn
R1 Bring both legs together and stitch all around (both legs making one
wrking piece
out of these two) (22 sts)
R2 *inc1, sc2* x7, inc last stitch (30 sts)
R3-R8 sc30
R9 BLO (back loops only) sc30
R10-R14 sc30
R15 *dec1, sc3* x6 (24 sts)
R16 sc24
R17 *dec1, sc2* x6 (18 sts)
R18 sc18
Stuff the body nice and firm
R19 *dec1, sc1* x6 (12 sts)
R20 sc12
Arms (make 2)
With flash color yarn
Sc6 in magic ring
R1 *inc1, sc1* x3 (9 sts)
R2-R3 sc9
R4 *dec1, sc1* x3 (6 sts)
R5*inc1, sc1 3 (9 sts)
R6-R17 sc9
Change color to white
R18 inc9 (18 sts)
R19 sc18
R20 dec9 (9 sts)
R21 *dec1, sc1* x3 (6 sts)
Stuff the sleeve.
Sew hands nicely on side of the body
Skirt
Slp stitch to any front loop stitch of the upper body part R29 and work
R1 *inc1, sc1* around
R2 ch3 counts as 1st dc, dc1 in same stitch, ch1, dc2 in same stitch,*skip2,
dc2, ch1, dc2 in same stitch* repeat around slip stitch last to first 3chain
made and continue with next round
R3 *dc2 in chain of shell made in R2, ch1 2dc in same loop* around
R4-R5 repeat R3
Second skirt pattern I used
Slp stitch to any front loop stitch of the upper body part R29 and work
R1 *inc1, sc1* around , slip stitch last to first
R2 working in back loops only, *hdc, sc, hdc over next three stitches,
long dc (inserting the hook in the base of sc made previous round)*
work this pattern 1 round
R2 ch3, turn, working in both loops (will work every second stitch this
round) in each long dc of previous round sc1, skip one, and sc3 in one
stitch, skip one- sc1 in long dc....continue this way around
R4 repeat R2
R5 repeat R3
R6 repeat R2
R7 repeat R3
R8 repeat R2
R9 5dc in sc made previous round, sc in long dc made previous round –
repeat this around
Tie off hide ends
Halo (star)
Sc5 in magic ring
R1 ch3, *dc1, ch1, dc1 in same stitch* x4, dc1, ch1 slip stitch to chain made at
start
You will create 5 petals or five points of the star
R2 ch3, *dc to chain between two dc (dc-ch-dc at previous round), ch3, slip
stitch in between petals, ch3* x4 ch3 and slip stitch to the base of first chain
made in this round.
Tie of leaving long end for sewing
Sew the star on top of angel’s head.
Hair
In white color thread/yarn
Sc4 in magic ring (do not close the ring) ch1, turn
Making rows here, so chain nad turn ater aech row is done
R1 inc4 (8 sts)
R2 *inc1, sc1* x4 (12 sts)
R3 *inc1, sc2* x4 (16 sts)
R4 *inc1, sc3* x4 (20 sts)
R5 *inc1, sc4* x4 (24 sts)
R6 *inc1, sc5* x4 (28 sts)
R7-R11 sc28
R12 do not turn, ch1, and work on sides (edges), sc around until you reach
magic ring,
In magic ring sc1, ch9, starting at second ch from hook, slip stitch 8
Repeat this two more time (making 3 bangs)
When finished with bangs, continue with single crochet stitches around next
side of the hair. Reaching end, tie off.
You can either make braids, pony tails, curls
Make them on the side of the head, using last row to slip stitch and continue
work
I made braids, waving the thread to first three stitches on each side, then
making
braids and folding them beneath the hair. Added wool bows on top of them.
Same way you can make curls. Slip stitch to side stitch, chain desired length
for curl to be and either double or triple stitch to one chain stitch in order to
reach curly look.
Repeat that for two or three stitches one each side.
For pony tails, make little tassels and sew on sides.
Ch7
R1 Dc to 3rd ch from hook, dc1 to next, dc2 in next, dc1, next, dc2 next (8dcs)
Copyright © AmigurumiBB by Vanja Grundmann 2013
R2 Ch3 (counts as 1st dc) , dc to next dc on previous row, *ch2, dc* across
this row (last dc will be in the place of chain3 of previous row-to achieve this
skip last “normal dc from previous row and stitch dc into chain (7dcs+1ch3)
R3 Ch2 turn, 2dc-ch2-2dc in second ch2 made previous row, skip one chain
and repeat 2dc-ch2-2dc two more times (same way, skipping one chain and
making cluster to next),to finish this row, make last dc to beginning chain of
previous row
R4 Ch2, turn, 3dc-ch2-3dc repeat three times making them in place of chains
of each cluster made previous row. Finish of with dc made in last chain of
previous row
R5 Ch2, turn, 3dc-ch2-3dc clusters make again in chains of each cluster
made previous row. Exception this time is ch2 between each cluster made.
Finish with dc in chain of previous row
R6 Ch2, turn, 3dc-ch2-3dc-ch2-sc to next chain of previous row
R7 Ch4, turn, 4dc-ch2-4dc made in chain of cluster made previous row, finish
row with dc to chain of previous row
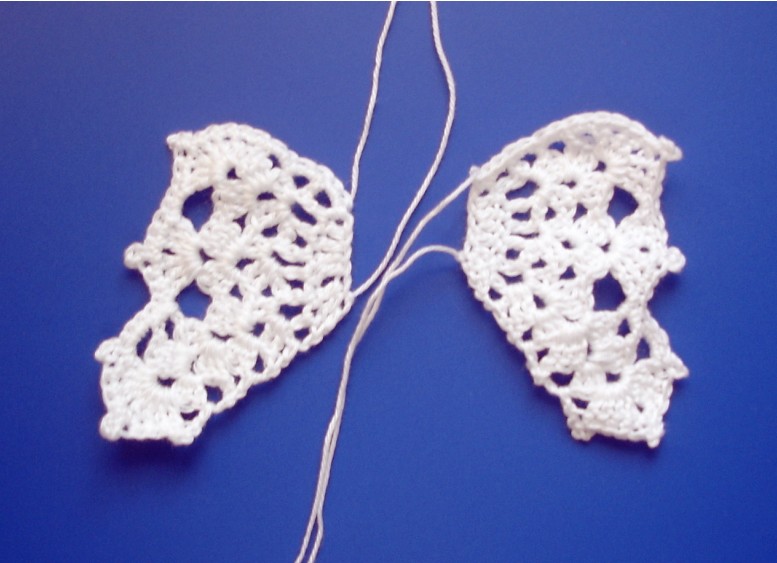
To finish – the pattern uses picots and single crochet around the wing.
Picots are made: ch3 on last working sc and then slip stitch to the base of the
stitch (or you can slip stitch to 3rd chain from hook)
If picot is difficult, you can single crochet around wing, just to make it firmer, or
you can leave it as it is.
After both wings are finished, sew them together over beginning 5 chain
stitches.
Use some fabric starch to harden and model the wings nicely
Hope you have enjoyed!
Leave a Reply


Related posts